*Windows xp installing time program
file document is confirm delete. Desktop personal file drive not (c) drive d,
e, f, g etc.
**
installing windows xp over vista installing time 2 file system is
selection.
*** FAT32- windows 95-99
**** NTFS- windows nt,windows 2000,windows xp.
Step-1:- Setup xp but table cd pc restart.
(press any to boot from cd...
look
picture

Setup-2:- Starting windows setup (option loading
some time wait)
look picture

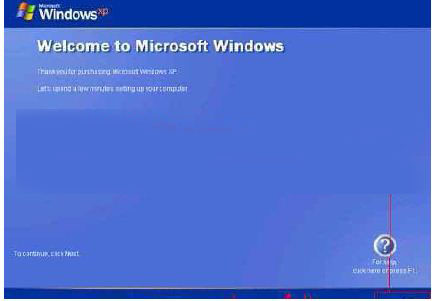
Setup-3:- Welcome
to Setup

*
To Setup Windows XP now, Press Enter
*
To repair a Windows XP installation using Recovery Console, press R
* To quit Setup without installing Windows XP, press F3
XP Setup Press
Enter
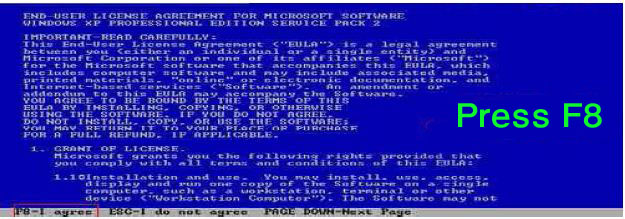
Setup- 4:- Windows
XP Licensing Agreement (press F8)

Setup-5:- Screen 2 option saw.

*
To repair the selected Windows XP installation, press R
* To continue installing a fresh copy of Windows XP without
repairing, press ESC

Step-6:-

*
To setup Windows XP on the selected item, press ENTER
*
To create a partition in the unpartitioned space space, press C
*
To delete the selected partition, press D
Step-7:- Format the partition using NTFS file system
(Quick) Select Enter

*Format the partition using NTFS file system
(Quick)
*
Format the partition using FAT system (Quick)
*
Format the partition using NTFS file system
* Format the partition using FAT system
*
Convert the partition to NTFS
* Leave the file system intact (no change)
Step-8:-
C is Formatting & file copy loading Restart ion
pc

Step-9:- Restring pc
after screen place loading file some time

Step-10:- loading file some time after page.

Step-11:- Personalize
Your Software
*** Name
*** Organization

Step-12:- ‘Your
Product CD Key’

Step-13:- You’re
choice Compute Name and Password

Setup-14:- Date and Time
Settings’ Time Zone (GMT+06:00) Astana, Dhaka


Setup-15:- Network
Settings, Typican Settings Next

Setup-16:-

Step-17
Step-18- Who
will use this computer. User Account –Your Name

Step-19


Step-20


Step-21


Step-22